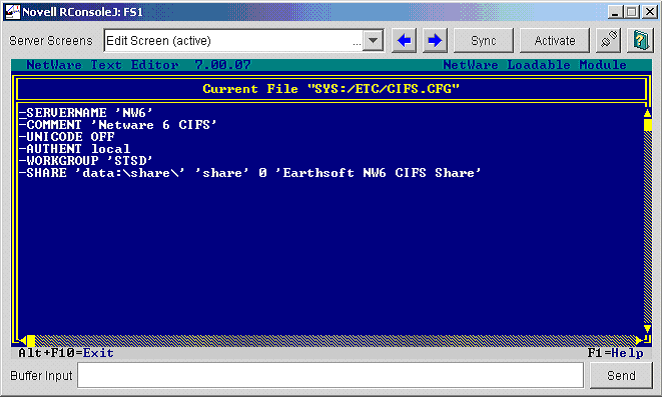
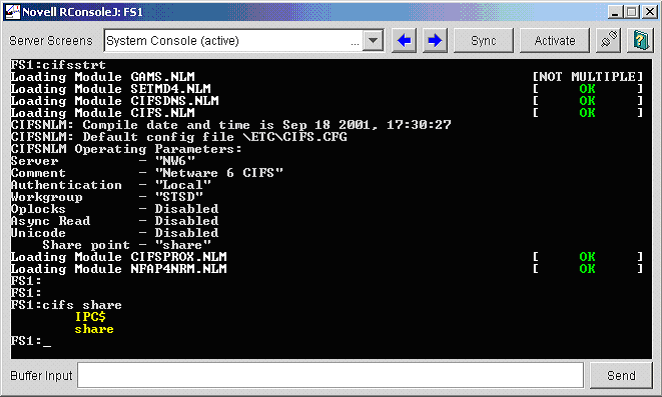
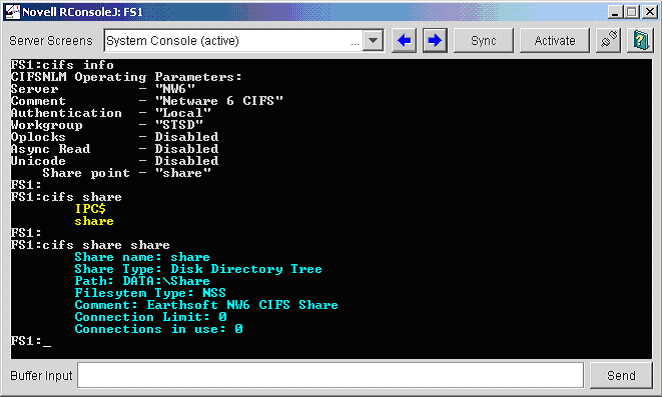
Created 6 18 2004 - Modified 6 21 2004

Universal Send using SMB (CIFS) on a Netware 5.x 6.x Server


1.   What does this page mean to me?
2.   How can this help me?
3.   What is CIFS?
4.   What is the Novell Native File Access Pack?  How do I get it?
5.   How do I check if Novell's Native File Access for Windows is installed?
6.   How do I install the Novell's Native File Access Pack for Netware 6.x?
1.  Installing Native File Access using the Netware Deployment Manager
2.  Installing Native File Access on the Netware Server with NWCONFIG
3.  Installing Native File Access on the Netware Server with Console1
7.   How do I configure Novell's Native File Access for Windows (CIFS) under Netware 6 SP3 and earlier?
8.   How do I configure Novell's Native File Access for Windows (CIFS) under Netware 6 SP4 and later?
9.   How do I start/stop Novell's Native File Access for Windows?
10.  How do I View Configuration Details about Novell's Native File Access for Windows (CIFS)
11.  Creating a simple password
12.  Setting permissions on the shared directory
13.  Setting up the iR to push scan to the shared directory


1.  What does this page mean to me?
Universal Send's Netware IPX supports “send to file” in a Netware environment using the IPX/SPX protocol only.
Using Novell's Native File Access for Windows it is possible to configure Netware servers running IP only to use CIFS (SMB) over TCP/IP.


2.  How can this help me?

Once Novell's Native File Access for Windows is installed on the Netware server, you can access shared directories without the need for Novell's Client 32
In the case of Universal Send, you will be able to push a file to a Netware server using SMB over IP


3.  What is CIFS?

CIFS is an acronym for the Common Internet File System
It is the standard way that computer users share files across corporate intranets and the Internet.
CIFS is an enhanced version of Microsoft's Server Message Block (SMB) protocol,
Under Netware 5.x and 6.x, CIFS is available through installation of the Novell Native File Access Pack


4.  What is the Novell Native File Access Pack?  How do I get it?

The Novell Native File Access Pack is included with the Netware 6.x operating system CD. 
This document will outline it's installation and configuration
The Novell Native File Access Pack is not included with Netware 5.1
It must be purchased from Novell
More info on that here


5.  How do I check if Novell's Native File Access for Windows is installed?

nwconfig, Product Options, View/Configure/Remove Installed products

../../images/push-netware-smb-1.png


6.  How do I install the Novell's Native File Access Pack for Netware 6.x

Get your Netware 6.x Operating System CD ready
I know of three ways
1. Installing Native File Access using the Netware Deployment Manager
2. Installing Native File Access on the Netware Server with NWCONFIG
3. Installing Native File Access on the Netware Server with Console1


1. Installing Native File Access using the Netware Deployment Manager
Obtain the Netware 6 Operating System CD.
Ensure your Netware 6 server meets the Netware Server Prerequisites
Ensure your Administrator Workstation meets the Administrator Workstation Prerequisites
At the Administrator Workstation, log in to the destination server that will run the Novell Native File Access Protocols software.
Insert the Netware 6 Operating System CD.
Run Netware Deployment Manager (NWDEPLOY.EXE) located on the root of the Netware 6 Operating System CD.
Click Post-Installation Tasks > Install Netware 6 Products.
HINT: If you are prompted to log in again while running Netware Deployment Manager, you can enter the IP address of the server by clicking Details
Follow along with the installation to install and configure Novell's Native File Access for Windows


2. Installing Native File Access on the Netware Server with NWCONFIG
Place the Netware 6 Operating System CD into the CDROM
Type volume
You will probably see something like this

../../images/push-netware-smb-2.png


Look under flags for NSS RO P
If you do not, you will probably have to load the CDROM modules

Type cdrom

../../images/push-netware-smb-3.png


Now type volume

../../images/push-netware-smb-4.png


See Netware6 that's the Netware 6 Operating System CD
The Mounted volume name Netware6 is important, we'll need that in a sec
We'll use nwconfig again here
nwconfig, Product Options, Install a Product Not listed, F3 (Specify a Path), volume name:
In this case volume name is netware6:   (Don't forget the colon)
Novell Install Services will begin, click here to continue

3. Installing Native File Access on the Netware Server with Console1
Startx if it isnt already running (startx)
Click Novell > Install.
At the Installed Products screen, click Add.
Enter the path to the Netware 6 Operating System CD and select the PRODUCT.NI file.
The Netware installation program, Novell Install Services will begin

The Netware Installation Program - Novell Install Services
Wait for a bit while The X window installer starts up
You will be asked "Please select the components to install"
Use clear all and then select "Novell Native File Access Pack"
Authenticate with admin rights
Confirm or change the LDAP ports if desired
Select Native File Access for Windows (Mac and Unix is optional)
Enter a Server Name and Server Comment (The name and comment seen in Network Neighborhood)
More on configuration is here
Enter a Workgroup or Domain name, WINS, or PDC
Select any or all IP address's bound to CIFS
Choose either sharing of all mounted volumes or specify specific volumes
Enter the NDS context searched for CIFS users
Click next to confirm and next to finish
The files are now installed
BTW since you installed files from the Netware 6 Operating System CD,  will need to install your service pack again (Doh)


7.  How do I configure Novell's Native File Access for Windows (CIFS) under Netware 6 SP3 and earlier
During the installation, I answered these questions as follows

Server Name NW6
Server Comment Netware 6 CIFS
Unicode OFF
Authentication local
Workgroup/Domain STSD
Shared Resource data:/share
Share Name share
Connections
Unlimited
Share Comment Earthsoft NW6 CIFS Share

These configuration settings which are stored in /etc/cifs.cfg have the following syntax

../../images/push-netware-smb-5.png

You can edit /etc/cifs.cfg manually or use the following configuration shortcuts

CIFS SHARE ADD ' localpath ' ' sharename ' connectionlimit ' comment ' adds a new sharepoint and also adds the command to the CIFS.CFG file.
CIFS SHARE REMOVE ' sharename ' removes the sharepoint and comments it out of the CIFS.CFG file.

CIFS will look for users in the contexts you specify at the time of installation
This configuration file is  /etc/cifsctxs.cfg


8.  How do I configure Novell's Native File Access for Windows (CIFS) under Netware 6 SP4 and later?

After you have installed Netware 6 Support Pack 4, you must configure your Windows/CIFS network environment with ConsoleOne.
Previously, CIFS parameters were configured by manually editing sys:\etc\cifs.cfg.
That file now contains a note telling you to use ConsoleOne for CIFS configuration.
Start ConsoleOne
Right click on the Server Object, select properties
Click the CIFS tab
Edit Config, Attach, Shares as required

CIFS SHARE ADD and CIFS SHARE REMOVE  seem not to have effect now

Note:
If eDirectory is reinstalled on a server running CIFS with the Netware 6 Support Pack 4, the ConsoleOne CIFS management does not automatically reimport the cifs.cfg configuration into ConsoleOne.
To reimport the configuration, un comment lines starting with ### from sys:etc\cifs.cfg and then run CIFSSTOP and CIFSSTRT.


9.  How do I start/stop Novell's Native File Access for Windows

The autoexec.ncf file has been modified to start the Native File Access types you chose
To start cifs manually (to avoid a reboot), type cifsstrt
Use cifsstop or cifsstrt to stop or start cifs to read any configuration changes

Typing cifsstrt
../../images/push-netware-smb-6.png

Typing cifsstop
../../images/push-netware-smb-7.png

BTW on my Netware 6 SP4 box I get this error when using cifsstop
You must unload NFAP4NRM.NLM before you can unload CIFS.NLM ...
I didnt read the SP4 documentation so it's probably explained there
I fixed it by simply removing the # in #UNLOAD nfap4nrm.nlm in SYS:SYSTEM\CIFSSTOP.NCF


10.  How do I View Configuration Details about Novell's Native File Access for Windows (CIFS)

You can view details about how Novell Native File Access Protocols are configured by entering the following commands at the server console.
CIFS INFO displays operational information.
CIFS SHARE displays all active sharepoints.
CIFS SHARE sharename displays information about a specific sharepoint.

../../images/push-netware-smb-8.png


11.  Creating a simple password

If Local authentication has been implemented, Windows users must have a simple password in order to access network resources using their native protocol (CIFS).

However, if Domain authentication has been implemented for your server, a simple password is not required.
Instead,  Domain authentication uses passthrough authentication to the Windows Domain Contoller

In our case, we are using local authentication and thus a simple password
This simple password is created with the Novell Cryptography Support module (NICI), which is included with Client 32
(You may need to install a more current version of the Novell Cryptography Support module (NICI).  If so, do a keyword search on NICI from here)

From a workstation with client 32 loaded, run ConsoleOne located at: sys:\public\mgmt\ConsoleOne\1.2\bin\ConsoleOne.exe
(For improved speed, you can copy the contents of  sys:\public\mgmt\ConsoleOne to your local hard disk)

Highlight the user object you wish to create a simple password, right click and select properties

../../images/push-netware-smb-9.png


Now select the Login Methods tab and choose simple password from the drop down

../../images/push-netware-smb-10.png

Enter and confirm the simple password.
That's it

12.  Setting permissions on the shared directory
The last thing you need to ensure is the correct permissions are setup on the shared directory
Make sure the iR product's Universal Send's configured user name has the correct permissions to write to this directory
The user must have at least these permissions
Read
Write
Create
File Scan


13.  Setting up the iR to push scan to the shared directory
I'd suggest testing if you can see and authenticate to this shared directory from Windows
Browse the network with network neighborhood, click the workgroup/domain you configured and the share name
Hopefully you can authenticate using the user name and simple password
Don't move on until you sort that out
Now from the iR, simply configure Universal Send with SMB and browse for the workgroup/domain and share
If you cannot authenticate ensure the iR's firmware is up to date
iR xx20 work great
Older i series cannot authenticate. 
I've asked Cris to update ours but he's busy
More on that later


Home                 Back

If you find an error or wish to comment please let me know.