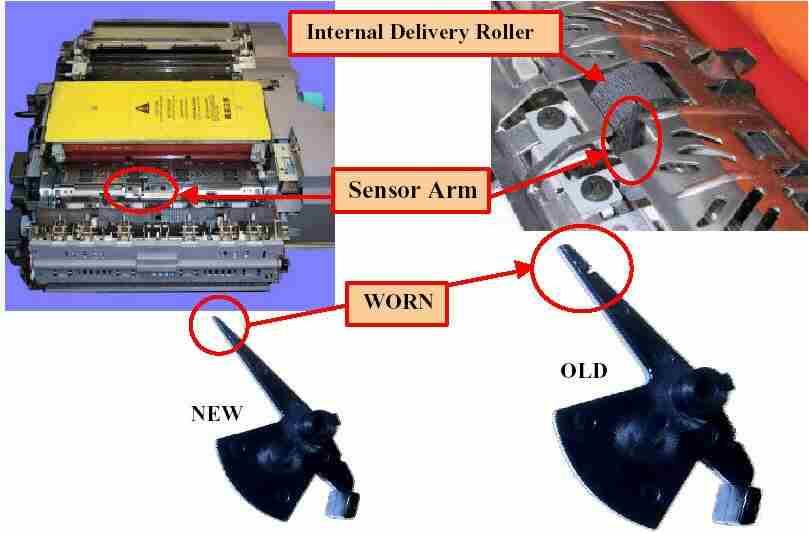
- Replace Sensor Arm FB4-2303-000
- Replace Internal Delivery Roller FB5-6833-000

iR-85/8500 Hardware Page
| DC-CON | 31.02 |
| R-CON | 10.01 |
| Feeder | 07.01 |
| Sorter | 04.03 |
| NIB |
|
| PS/PCL | 41.10 |
| MN-CONT(Main Controller) | 63.01 |
| BOOT-ROM | 10.29N/C |
| RUI | 62.05 |
| LANG-EN | 63.01 |
| LANG-FR | 63.01 |
| 1) The Message "The Platen Glass Is Dirty" keeps appearing on the control panel screen. |
| 2) Blank Copies. |
| 3) When Replacing the Fixing Web. |
| 4) 010C and /or 020A Jam Codes |
| 1) Flashing The iR-8500 machine. |
| 1) Which Service Support tool must be used with the iR-8500 machine? |
| 2) The scan function the iR-8500 is to slow, how can I speed it up? |
1) The Message "The Platen Glass
Is Dirty" keeps appearing on the control panel screen.
- Clean the copy board glass, it may be dirty.
- The feeding belt of the ADF maybe excessively
dirty. Clean or Replace the Feeding Belt.
- Adjust "CCD-ADJ" and/or "LUT-ADJ "if
the problem is still present.
2) Blank Copies.
- Broken shaft on dev. drive assembly
- Replace the Dev Drive Assembly (FG6-7327-000)
3) When Replacing the Fixing
Web.
-Be aware that upon replacing the web there
are TWO counters that need to be cleared to avoid or remove the
E005 code indication
-These counters are located at COPIER>COUNTER>MISC.>FIX-WEBandCOPIER>COUNTER>DRBL-1>FIX-WEB.
4) 010C and /or 020A Jam Codes
- Replace Sensor Arm FB4-2303-000
- Replace Internal Delivery Roller
FB5-6833-000

1) When the power is turned on,
the display screen on the control panel is blank.
- Poor grounding on the Control Panel Board PCB (
i.e.- main controller).
-Remove the control panel PCB board and clean the
grounding contacts in the system box assembly and reinstall in the
machine.
2) Error code E733-0001.
- This is a communication problem between the DC
controller and the Control Board PCB (i.e. Main Controller).
-Check to see if LED 1 and LED 2 on the DC
controller blink on and off once power is turned on.
-If the LED's Do Not blink, then replace
the DC Controller.
- If problem persists then replace power
supply .
3) Blank/ Light Screen,
machine boots up O.K.
- Cold solder joint on J1 control panel
touch screen power supply. (FG6-7738-000)
4)E744-0001 codes after
downloading the Language module to the machine.
- This code will occur after replacing an existing
language module with a module of an inappropriate version.
- Reload software of a module of the same version
using the Service Support Tool.
5) E677 Codes
- If the "BOOT ROM" is a Copier Version
and the System Software is a Network Version then the E-677
code will occur.
- Reload the proper system software with the correct
"BOOT ROM"
6) When the machine is Powered
Up, the progress bar stays at about 90% completed
- Corrupted Boot Rom
- Replace Boot Rom
FLASHING THE iR 8500
THE iR 8500 COMES AS A STAND ALONE COPIER
EQUIPPED WITH THE COPIER DIMM (labeled C). TO MAKE THIS INTO A
NETWORK PRINTER YOU MUST INSTALL THE PRINTER DIMM THAT COMES WITH THE
PRINTER BOARD (this DIMM is labeled N)
WARNING
BE SURE TO ONLY FLASH NETWORK SYSTEM SOFTWARE
TO MACHINES WITH PRINTER DIMM (labeled N on chip) ON BOARD AND COPIER
SYSTEM SOFTWARE TO MACHINES WITH COPIER DIMM (labeled C on chip) ON
BOARD.
IT IS NOT POSSIBLE TO UPGRADE A
STAND ALONE MACHINE TO A NETWORK MACHINE BY FLASHING. THE DIMM
MUST BE CHANGED.
STEPS
THE iR 8500 REQUIRES AT LEAST VERSION 1.25
SERVICE SUPPORT TOOL.
CLICK HERE TO
SEE THE REQUIREMENTS OF THE LATEST VERSION.
1. TURN iR 8500 OFF AND CONNECT THE
LAPTOP TO THE COPIER.
2. WHILE TURNING ON THE iR 8500 ENTER THE
DOWNLOAD MODE
3. IF THE HARD DRIVE IS BEING REPLACED, DO
HDFormat
4. IF HARD DRIVE IS NOT BEING REPLACED AND
ONLY SYSTEM SOFTWARE IS BEING UPGRADED SELECT 'FUNCTION>SYSTEM>DOWNLOAD,PRESS
OK AND WAIT FOR SCREEN TO READ STANDBY
5. FLASH THE MACHINE SOFTWARE IN THE
FOLLOWING ORDER i) SYSTEM ii) LANGUAGE iii) RUI.
1) Which Service Support tool must be used with
the iR-8500 machine?
- Service Support Version 1.25 or higher
Must Be Used with the iR-8500 machine.
2) The scan function the iR-8500 is to slow,
how can I speed it up?
- if the scanner on the iR-8500 is scanning every
image, make sure the stream reading feature is turned on.
- enter Service Mode > feeder > option
> DOC-F-SW.
- enter "0" to enable the stream reading
feature.
If you find an error or wish to make a comment, please let me know.