Updated Nov 23 2004
Cloning the iR110 Series Hard Disk
1. What does this mean to me?
It takes 2 to 4 hours for a complete software install on the
iR110/125/150's hard disks
With procedures outlined in this page, it is possible to create, store
and have ready an exact replica (clone) of a iR110/125/150's hard disk
In the event of a hard disk related hardware or software failure an
iR110 customer can be up and running within minutes.
Click
here for information on how to to backup using DD over NFS
Click here for information on
how to backup using UFSDUMP/UFSRESTORE over NFS
2. What hardware does it apply to?
What hardware does it not apply to?
The information in this page applies to a iR110 Sun Spark Ultra 10
(IDE
Hard Disks).
It can be easily modified to work with a Ultra 60 or V240
3. What hardware do I need to have ready?
This procedure assumes the source drive and clone drive are identical.
You may have to purchase two brand new hard disks.
The current
specifications for the Ultra 10 include 3 types of 20 Gig EIDE hard
disks
Seagate ST320420A
(20.4GB - 7200 RPM Ultra ATA/66)
Barracuda ATA II
Seagate ST320414A
(20.0GB - 7200 RPM Ultra ATA/100)
Barracuda ATA III
Seagate ST320011A
(20.0GB - 7200 RPM Ultra ATA/100)
Barracuda ATA IV
These drives must be purchased directly
from Sun for they have special firmware to allow the Ultra
10
to "See" the entire 20 GB
This is a direct quote from www.sun.com
"The new 20-GB EIDE drives from Sun have firmware in place that
allow Solaris 2.5.1 and Solaris 2.6 users to access the entire disk.
This may not be true of 3rd party EIDE drives."
We purchased 2 Seagate ST320011A's and tried. It is
true. The Ultra 10 will see only 8GB.
According to Sun, these hard disks are about $300.00 US
The Hard Disk Cloning procedure then represents 0.33% of the cost of
a loaded iR110
It is silly to not consider 2 identical drives to provide a total
customer solution.
4. I am ready to Clone my iR110 Ultra
10. I need a step by step procedure
Cloning the iR110 Hard Disk
Step by Step
1. Before doing anything
Power on the SCS and let it boot to the OCI login screen
1. Start a Command tool
2. Use su - to logon as root
3. Type touch reconfigure. (This will cause the Ultra 10 to look
for new hardware changes on the next boot) See Note:
4. Type init 5 (This will shutdown the Ultra 10 box)
(*Note: It is possible to use
the command boot -r to accomplish the same task however, using touch
configureavoids a few steps)
(This is explained in more detail in Step 10. Below)
2. Get your two new hard disks out of their
packaging and take note of the jumper settings.
The Ultra 10 probably uses a Cable Select type of Hard Disk selection.
The Cable
select method is much easier than the old Master/Slave jumper
method
Simply leave both hard disks set to cable select.
The Cable Select cable is special.
Notice the cable ends are labelled Master or Slave.
Please be aware of this when we install the drives in the next steps
It is recommended to label the hard disks.
Put a sticker on each, perhaps Original and Clone
3. Physically installing the hard disks into the
Ultra 10 box
Here is a Step by Step procedure.
Click on the images to make them bigger
|
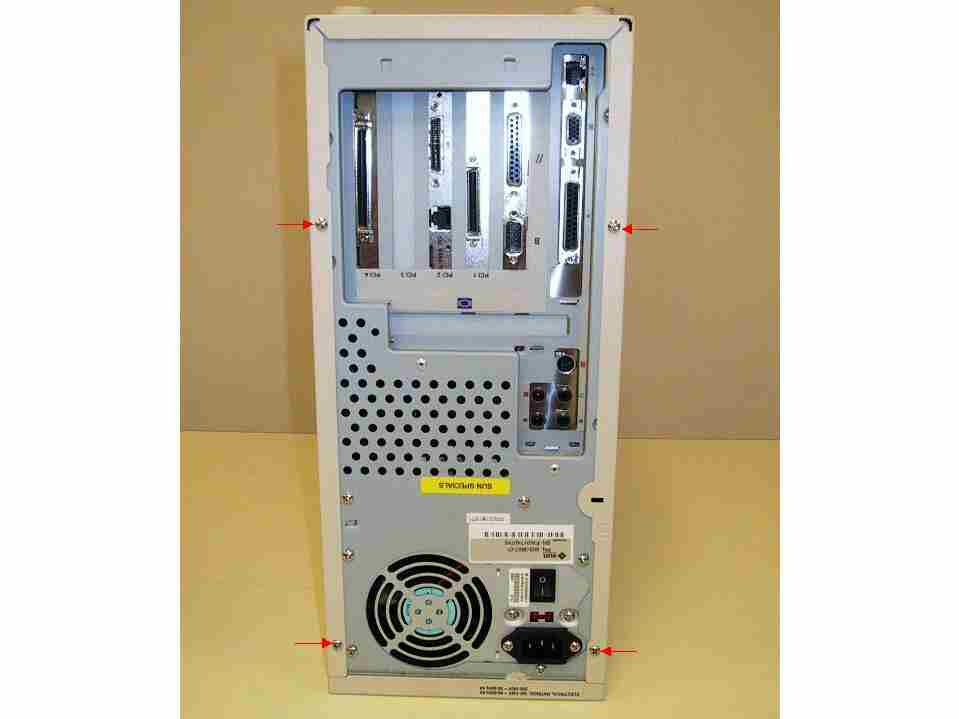
Step 1
|
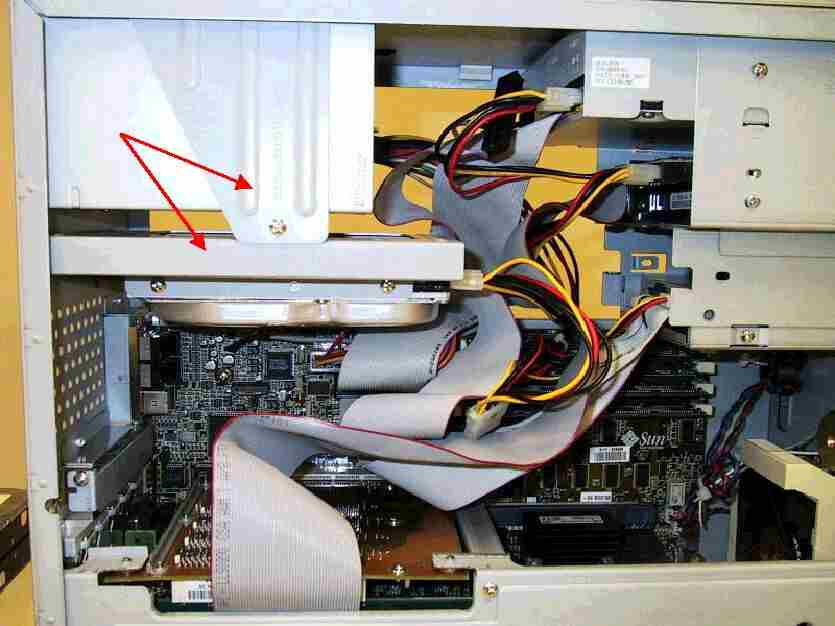
Step 2
|
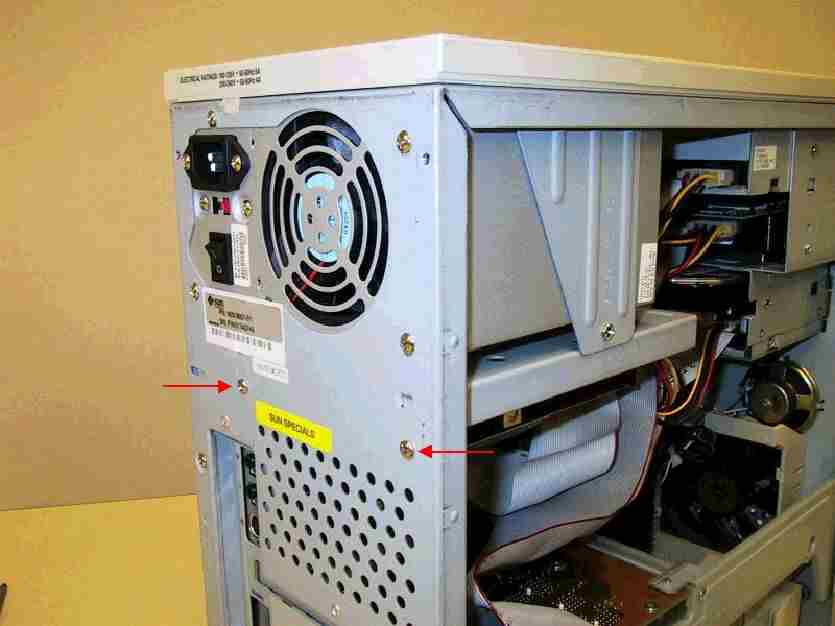
Step 3
|
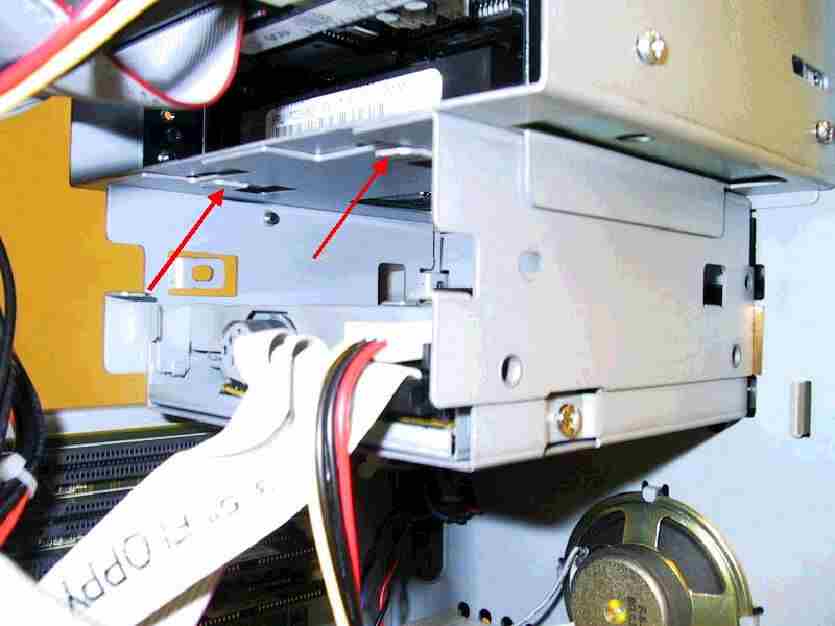
Step 4
|
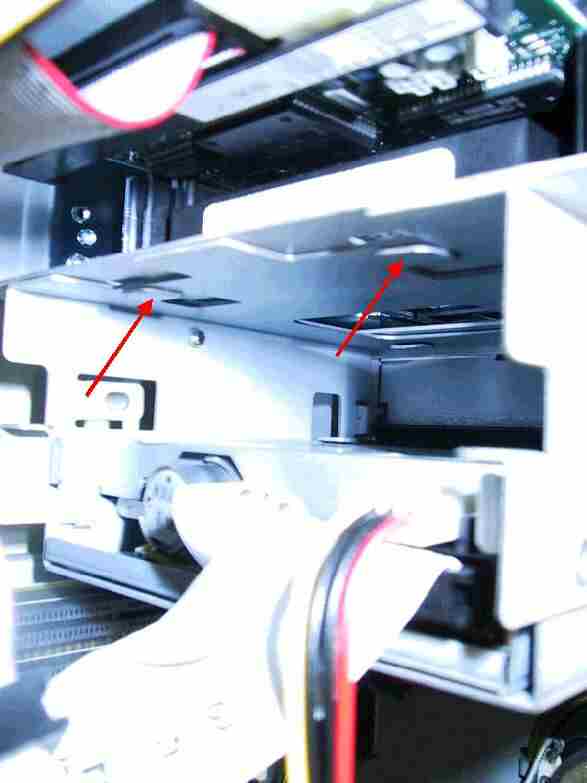
Place the Ultra10 upside down on a table.
Remove the 4 screws indicated in the diagram below. |
The existing hard disk is held in with a bracket |
Remove the two screws indicated below. |
Remove the old hard disk and bracket all at once.
Install one of the new hard disks onto the bracket. |
|
|
|

|
|
Step 5
|
Step 6
|
Step 7
|
Step 8
|
This is where other new hard disk is to go. You
must bend two metal tabs up in oder for the drive to fit.
Be carefull!! |
Here is a closeup of the two tabs already bent up. |
The second hard disk fits like this.
Attach it with two screws |
Both hard disks are now installed
Route the cables cleanly
Ensure the hard disk on the left (mounted to the bracket) is on the
"Master" connector
The other is on the "Slave" connector |
|
|

|

|
4. Installing the iR110 software
Connect the Ultra 10 power cable and boot the machine
Let the Ultra 10 boot. It will eventually stop with an error
(Because of the blank hard disk)
Use stop a to get to the OK prompt
You can now follow your iR110 installation guide and install all the
required software as you would for any install
You dont need to worry about installing to the correct hard disk
The iR110 software installation scripts will take care of everything
5. Licence, configure and test your installation
Get the iR110 up and running as per the customers requirements
You will be cloning your install so ensure everything is running well
before you do.
6. Final preparations and Cloning
Once you are ready to clone, I suggest using FSCK to ensure things are
cool.
1. Use su - to root
2. Type init 0 (shutdown to run level 0, OK prompt)
3. Insert the iR110 Operating System Software CD into the CD-ROM
4. Type boot cdrom -s
5. Wait for the machine to boot (About 4 minutes)
6. Type fsck /dev/rdsk/c0t0d0s2 (Say yes to fix
whatever requires fixing)
Now that we have fsck'ed the hard disk, we are ready to clone
7. Type the following two commands in
order. Take your time and look out for spacing. The | symbol
is called a pipe and is a shifted \
|
Command #1
|
prtvtoc /dev/rdsk/c0t0d0s2 |
fmthard -s - /dev/rdsk/c0t1d0s2
|
|
Details
|
Print the disk volume header information (Becomes
standard input) Pipe it through the fmthard command to update the VTOC
(Volume Table of Contents) When " - " is used,
fmthard reads from standard input. |
Command #1 completes in less than 1 second
|
Command #2
|
dd if=/dev/rdsk/c0t0d0s2 bs=32k
of=/dev/rdsk/c0t1d0s2
|
|
Details
|
Make a copy of an input file (if=) and send the results
to the output file (of=) using a block size of 32k |
Command #2 will take about 30 minutes Please be
patient
11. Type init 0 to reboot the machine
to
the OK prompt
12. Eject the CDROM manually and remove the Operating System
Software CD
13. Power of the machine with the power switch. (Since we
gracefully shutdown with init 0, it is safe to do this)
You have successfully cloned the Ultra 10
|
5. Testing the Cloned Disk
It would be wise to check the Cloned disk
Disconnect the Cloned disk from the Slave connector and put it on the
Master connector
Connect the Ultra 10 power connector and boot it up
Hopefully it will boot properly
Let it boot all the way to the OCI login
Test the clone out to make sure everything is cool.
Use init 5 to shut it down properly
If it does not boot properly, try repeating the cloning process again
6. Disconnecting the Cloned disk
It would be wise to now disconnect the cloned disk and leave it in the
machine in case of an emergency
After that we should tell the Ultra 10 that a new hardware change has
occured
1. Disconnect the power cable.
2. Disconnect the 'slave' drive power connector and the IDE
connector.
3. Reconnect the 'master' drive power connector and the IDE
connector
3. Reconnect the power supply cable and reboot the Ultra 10
4. Wait until the Ultra 10 completely reboots
5. Use su - to root
6. Type init 0 (This will shutdown to the OK prompt)
7. Type boot -r (This will reboot the machine and look
for
hardware changes)
Congrats. You are finally done.
7. In an emergency how should I use the
cloned disk?
You could be in one of two situations:
1. You have 2 disks in the Ultra 10 and you already followed
the procedure in this page
2. Your customer only has 1 hard disk and you have not yet
cloned. (For situation 2, check out step 10 below)
I am assuming you have 2 disks and have followed the procedures in
this page to create a cloned image
If the customers original hard disk is still operational, you may be
able to still access any of their files on the hard disk (Optional)
If however it is totally dead skip the (Optional) step below.
You will have to use touch reconfigure or boot -r to get
the Ultra 10 to "See" the hardware changes. See Item 10
1. Power off the Ultra 10 and disconnect the power cable
2. Remove the Ultra 10 cover as outlined above
3. Disconnect the Master and Slave drive connections
4. Put the Slave drive (The clone) onto the Master drive
connector
5. Optional. Put the Master drive (The problematic
original) onto the Slave connector
6. Reconnect the power cable and power up the Ultra 10
Your Ultra 10 should boot successfully
With luck, any of the customers original files with still be available
on the original hard disk.
8. Can I use a clone of one Ultra 10 on a
different Ultra 10?
I tried this in our lab on one machine and Yes it appears to work
When the Ultra 10 boots, it will find probably find a SCS key mismatch
This is the error I got
Not Licenced for any known product configurations
Obtain the SCS licence key for the host ID: XXXXXXX
Enter licence key (or press return to continue)
Enter the correct SCS licence key and you should be up and running
9. What does Slice and c0t0d0s0 mean
In Unix world, a partition is called a slice.
The root slice is 0, slice 1 is swap
Slice 2 is the entire disk!!
Here is an explanation of the c0t0d0s0 thing
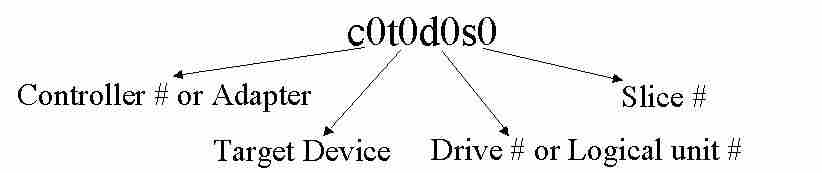
So...
c0t0d0s2 Is Slice 2 of the master hard disk
c0t1d0s2 Is Slice 2 of the slave hard disk
10. I need to tell the Ultra 10 to look
for new hardware changes
If you plan to add new hardware to the Ultra 10, you must tell the
machine to look for the new hardware
There are two methods:
1. Touch Reconfigure (This will
cause the Ultra 10 to look for new hardware changes on the nextboot)
2. Type boot -r (This will boot the Ultra 10 now
and new hardware changes will be scanned)
Touch Reconfigure
1. Start a Command tool
2. Use su - to logon as root
3. Type touch reconfigure.
boot -r (From the ok prompt only)
1. Use init 0 to get to the ok prompt
2. You can also use stop a but this is very
dangerous and not recommended
3. Type boot -r
11. How can I wipe my Ultra 10 hard disk
clean and start fresh?
1. Use su - to root
2. Type init 0 (shutdown to run level 0, OK
prompt)
3. Insert the iR110 Operating System Software CD into the
CD-ROM
4. Type boot cdrom -s
5. Wait for the machine to boot (About 4 minutes)
6. Type format and hit enter
7. Select the disk you want to format
8. Select p and hit enter
9. Select p and hit enter (again)
10. This will print to the screen the current slice table
Here is an example of our Ultra 10 with a Seagate ST320420A
rt
Tag
Flag
Cylinders
Size
Blocks
0
root
wm 0 -
3657
1.76 GB
(3658/0/0) 3687264
1
swap
wu 3658 -
5689 1000.12
MB (2032/0/0) 2048256
2
backup
wm 0 -
39532
19.00 GB
(39533/0/0) 39849264
3
var
wm 5690 -
21943 7.81
GB
(16254/0/0) 16384032
4 unassigned
wm 21944 -
39532 8.45
GB
(17589/0/0) 17729712
5 unassigned
wm
0
0
(0/0/0)
0
6 unassigned
wm
0
0
(0/0/0)
0
7 unassigned
wm
0
0
(0/0/0)
0
11. You will be repeating the following steps for all
partitions exept partition 2. Do not delete partition 2.
Select the partition you want to delete by typing the
partition number and hitting enter
Enter Partition ID tag: Enter
Enter partition permission flags [wm]: Enter
Enter new starting cyl [0]: 0
Enter partition size: 0
After you are done, select p and then enter to print the
current
slice table to the screen.
It should look something like this:
rt
Tag
Flag
Cylinders
Size
Blocks
0 unassigned
wm
0
0
(0/0/0)
0
1 unassigned
wu
0
0
(0/0/0)
0
2
backup
wm 0 -
39532
19.00 GB
(39533/0/0) 39849264
3 unassigned
wm
0
0
(0/0/0)
0
4 unassigned
wm
0
0
(0/0/0)
0
5 unassigned
wm
0
0
(0/0/0)
0
6 unassigned
wm
0
0
(0/0/0)
0
7 unassigned
wm
0
0
(0/0/0)
0
12. Type label enter. Then confirm with y
(This will write the slice table to the hard disk)
The Ultra 10 hard disk is now ready for a fresh install.
Type init 0 and begin the installation procedure
<>
12. Proper use
of FSCK
In my humble opinion, I think there is a significant amount of
misinformed and dangerous usage of the fsck command
Read more about this here
Home Back
If you find any errors, ommisions or have a better way, please contact me